Wednesday, March 10, 2010
How to create Interactive Learning Centres (Hyperlinks in PowerPoint)
Monday, November 23, 2009
Download Youtube movies
It is a free Firefox extension that sits on your Firefox toolbar. When you find a movie that you want to download just click on the Video Download button and choose from the Dropdown list the format you would like to save the movie in. Click on Download and it will download to your Download folder.
If you download as a .flv you will need an flv player.
If you download it as a mp4, you can play in Quicktime player or Media Player.
Be aware when you go to this site that you want to click on the 'Install the extension' this will add the Youtube downloader extension.
WARNING: You might not want to click on 'They are here' link, this leads to a place where you can search for movies but it brings up movie choices that are definitely not educational!
Saturday, October 17, 2009
How to create Publishing Paper with lines
- Open Word document
- Insert a text box by clicking on the text box button
- Click and drag a box on the page that is a suitable size for a picture
- Click and drag another text box on the page that is a suitable size for publishing lines
- Set the font size to 28
- Hold down your shift key and the minus key, as you hold down both keys lines will appear on the page
- Change the size of the lines by highlighting all the lines and changing the font size
Friday, October 16, 2009
How to save a Paint document as a jpeg
Wednesday, September 16, 2009
Embedding Movies and removing related Movies
 One of the biggest problems with embedding Youtube movies is that they have related movies showing on the end of clips and they are
most of the time not appropriate at all for students, or even have anything to do with the video you have uploaded.
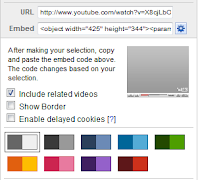
There is an option on Youtube to embed movies without Related Movies.
Click on the More Options button (blue cog wheel) at the end of Embed.
Click in the box that has the tick next to 'Include related videos' so that the tick is not there anymore.
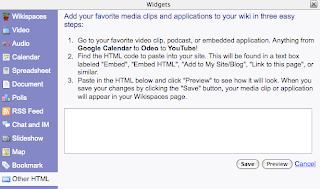
 When you embed a movie in Wikispaces, click on the Embed Widget, do not select Video but click on Other HTML and paste code.
If you select Video it removes the 'w/o related videos, Other HTML will keep the w/o related videos code and the coloured border if you have ticked that option as well.
Many thanks @KiwiJoe90 for this hint.
But sometimes for some unknown reason, that does not work so there is one more step to take.
When you copy the Embed code from Youtube and place it your blog or wiki, go back to your Youtube site and look at the internet (URL) address at the top of the page, note what the last few letters/numbers are.

Go back to your blog or wiki to the embed code you wrote and insert at the end of the URL the following code
In this example the blue is the youtube url and the yellow is the code inserted
Many thanks to @MiriamTuohy for helpful hint!
Another helpful hint came from @paulajamieson who suggested Vimeo and School Tube.
Vimeo looks like a great video embedding tool, no related videos but at the end of the movie there is an option to add comments. I will review School Tube later and add it to this post.
Thursday, July 23, 2009
How to insert a division sign in Word
Word 2007


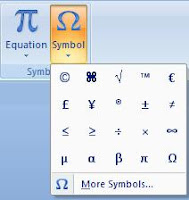
- Click on the Insert tab on the Ribbon
- Click on the Symbol button
- Click on the Division symbol (or click on More Symbols if it is not there)
- The Division symbol will now appear on the page
Word 2003
- Go to Insert - Symbol
- In the Font box scroll down until you see the font name Symbol

- Look for the Division sign
- Click on the Division symbol
- The Division symbol will now appear on the page
If you want to use this symbol frequently then you can assign a shortcut key.
Assign a Shortcut Key

Word 2007 - Click on Insert tab, and then on Symbol button
Word 2003 - Go to Insert - Symbol
- Click on More Symbols
- Click on Division sign
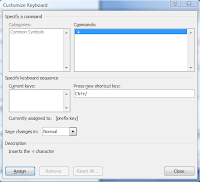
- Click on Shortcut Key button
- Press a new shortcut key combination (I use Ctrl/)
- Click Assign and Close
Sunday, April 12, 2009
Tips with Delicious #1

More and more people are using Delicious with multiple accounts. Teachers are setting up Professional accounts, personal accounts and accounts for the classroom.

How do you switch from one account to the other?
First of all it is a good idea to Network to your accounts. Click on Network under your Name.
Click on Add a User to Network.
Type in the user name
 .
.Click Add.
From now on, no matter what account you are logged into, you will see your other accounts.
How do I Switch accounts so that I can tag websites?
You need to sign out of the account you are in and then sign in under the new name.

How do I add websites from other Delicious Accounts?
Sign into the account you want to add to, go to Network and click on a User in the Network.
The long way of adding sites is to Control click (Apple Click) on each link that interests you (this will open the website in a new tab). If you like the look of the website then click on the Tag button on your toolbar.
The short way of adding si
 tes is to read the description of the site as it appears, (check out the tags on the right hand side, they are a helpful indication to what the site is about) then click Save next to the title of the website. This will add this website to your Delicious Account.
Monday, March 30, 2009
Keyboarding Practice Cards
Monday, January 19, 2009
Word 2007 (Windows) and blogging
If you are the latter then Word 2007 offers a blogging option. Go to  and select New and
  select New Blog Post.
First of all you will have to set up an account, and a dialogue box will appear where you will have to identify your Blog provider (in the case of this blog it is 'Blogger'). There is a pictures option but you need to be able to identify your own server to access the pictures, so it might be easier to leave the pictures alone and add them in the final stages. Once you have identified your provider, type in your User name and password that you usually use for editing your blog. Select your blog if you have more than one and then you can start typing in your new post. You can add more blogs by clicking on the Manage Accounts, going through the same procedure as before.
Now you can type your blog offline, save and return to it when you like.
When you are ready to publish, click on the Publi sh dropdown menu button. If
you choose Publish it will go st raight to your blog site. If you choose Publish as Draft then you can add your photos.
Friday, November 28, 2008
How to add Jigzone Jigsaws to a Wiki
Cartoonise the photos using Befunky or any other Photo Editing programme (http://delicious.com/sharpjacqui/photoediting)
Then turn that photo into a jigsaw by creating an account at Jigzone
Here are the instructions for embedding Jigsaws from Jigzone into Wikis.
How to Add Jigzone Jigsaws to a Wiki


